
Back to Home Page 2009 Ramblings 2008 Ramblings
Lucy and I stayed at the cabin for two weeks over Christmas and the New Years. It was nice to get back. We spent many an hour sitting in our new hot tub watching the stars overhead or the cold wind on our backs or having snowflakes fall around us. It is quite nice. We've got the routine down now, 2 hours to fill the tub in the morning, when it is really cold out 3-4 hours with the fire on and the top closed brings the water temperature up from about 40F to 105F. You have to stir the water occasionally or all the hot water is on the top and a stir will drop the temp by 5F. At 105F you can stay in for about 30 minutes but as the temp drops to 102 and lower you can stay in for hours, and we have.
We also made several trips hauling wood to the cabin and house. We’ve almost moved 5 cords but it’s mid January now so who knows how many we will burn this winter.
We’re back at the house. Glad to be back but I am sure we will want to be at the cabin in a couple of weeks. We had our first winter rental in the cabin, three couples (including staying in the yurt). They were quite used to camping and everything went smoothly. They also had two dogs which brought our boys (dogs) to life when they checked in and out. On Monday the boys disappeared about noon and were still gone about 5 PM. I checked with the neighbors but no sign of them. A quick drive out to the cabin on ski doo and there they were. We think they followed the trail of the visiting dogs back to the cabin. Theo would have gotten tired then and gone for a sleep. Loyal Winston stayed with him. They were very glad to see me and Theo enjoyed his ride on the back of Vinnie the Venture.
A large balsam had broken at the base and was leaning on a large maple in front of Owls Nest. I got Zach and a chainsaw and proceeded to haul the tree out onto the road and cut it up. Well I had to cut a couple of 8 foot sections off the bottom first as Zach couldn’t pull it out with the base wedged into the ground . Actually I think Zach could have done it but I broke two chains in the attempt so prudence suggested smaller bits. Over the weekend I took the branches off and hauled 8 foot sections of the trunk with the ATV (those tracks are great) to the hole in the trail by the beaver dam on Merry Go Round trail. I spent the better part of the weekend doing this and burning what was left of the balsam. Lots of fun.
We had three sets of guests last weekend at the yurt, Saturday night, Sunday night and a couple in by dogsled Monday night. I was quite concerned about the temp, -25C at night, mostly because we forgot to put the wool felt sides up on the yurt until it was too late (all the horse hair ropes are frozen in place). What’s the insulation value of tyvec and canvas??? Not much. No need to worry though. We got the yurt warmed up and even though there isn’t any mass to it, it kept it’s warmth. No one complained about being too cold at night.
Setting up took us a complete days with getting there early lighting the fires, getting water set up, making beds, etc…
Last summer I managed the heroic feat of getting 25 cords of wood split and stacked. I thought this would last us 3-5 years at least. I still think it will but I hadn’t counted all the wood stoves we keep going. There are two in Owls Nest. We pulled the Jotul out from inside the fireplace (it is much too pretty to be hidden like that). I reconfigured it from top draft to back draft. I needed just 2 feet of connectors and elbows to reconnect it. Total cost? $140 for three doubled walled pieces. But now it looks very pretty in the living room and we get an incredible amount of heat in the room instead of heating up the stone fireplace.
The third wood stove is in the cabin, the fourth is in the yurt and the fifth is our latest addition heating up the Oforu soaking tub. That’s a lot of stoves and that’s a lot of wood. Every week I pull a double sled of wood to Owls Nest and at least one sled to Lone Wolf. Each sled holds about ¼ cord so the wood is burning up fast. But that’s what it’s for!
Lone Wolf cabin midweek Rentals
Lucy and I decided to try renting the cabin for 4 nights during the week. What a great idea! We already have four reservations this month and next. We also have several weekend bookings also. Things are going great.
PS Alvin became a consultant last week
Went dogsledding yesterday morning. Now that was fun, fun, fun!!! Eric and France, our neighbors, run dog sledding tours so Thursday morning myself and a Dutch couple staying at the cabin headed over. The first thing you do (after signing the waiver) is to head back to where the 60+ dogs are and get the sleds hitched up. Actually you watch while Eric and France hook up six dogs each to 5 sleds. Actually before that you get some driving instructions from Eric on how to handle the sled, how to brake, how to hang onto the sled when you get tipped over, etc…
The braking system is neat. The first part is a rubber mat that hangs between the two runners where you stand. The dogs are attached to a line in pairs. As soon as you see any slack in the lines that means that the sled is catching up to the dogs (downhill say) so you have to brake which means stepping down off the runners onto the mat, one foot for a bit of brake, two feet for a lot. The mat is on bungies so when you get back on the runners it flips back up. Well that slows you down to a stop, you stand on the metal bar at the front of the mat which drives two aluminum stakes into the snow, stopping the dogs dead. Want to get off the sled but keep it parked? That's where the parking brake comes in, a hook running from the front of the sled to the back that you take out of it's holder and stomp into the snow so the dogs can't drag the sled away when you get off.
So off we go, a bit nervous getting used to the rig. Everything goes fine, there is a couple of inches of fresh snow on top of hardpack so we are going fast. Now you are an extended vehicle and like a big truck you need to take corners wide so the back end (you) gets around. Well no one told the dogs about that. They cut the corners right at the trees so when you and the sled get there you are bouncing off rocks, trees, whatever was too big for the dogs to go over. Once you get the hang of it you can wight one ski on the sled to make the turn but at the beginning you are hanging on for dear life as the sled goes up in the air on one runner threatening to throw you off as you make the turn. Eric has made plastic sleds as he was tired of repairing busted up wooden ones. Wanna know if a trail is used for dog sledding? Just look as the trees on the corners. If everyone looks like something hit them the it was someone on a sled.
Well two hours went by like nothing. Lucy was waiting to take pictures at the road at Owls Nest where the dog sleds usually come but the snow was so fast that we make an extra big loop and didn't get near our home.
It was so much fun that I would love to have my own sled and dogs but then again, I can just mush over to Aventures Nordik and use there. Maybe when Theo grows up he can pull a sled??? Go Theo go!!!
So what to do the rest of the day? I spent the afternoon brushing trails above Owls Nest and cutting a new trail to Sioux Lookout. I'll probably have the backhoe come in next summer to make a 200 foot path up the side of the hill or maybe I'll just pick axe it myself. Not to stop, I spent 2 hours playing vball last night after dinner. Gosh am I stiff!!!
Local dog sledders Nordic Adventure
I got the tractor running for the first time this spring. The loading forks were resting on the spot where Lucy wants a lettuce garden this year so I took the bucket loader off, wheeled Zack to the forks and loaded those on. The next step was to move the compost from the composter to the garden and wouldn’t the manure bucket on the tractor be just the perfect tool to do the job? Well after having busted a cheap hammer getting the locking pins in on the forks I wasn’t in the mood to change back to the bucket again so shovel and wheelbarrow did the trick. It was interesting to note that while the ground seemed firm and dry, the tractor sunk into the ground quite a bit as I wheeled him about. It may be warm out but the ground is still soft.
Sauna, Blackflies and Snow!!!
Lucy, Josh Dagg and I (well mostly Lucy and Josh anyways) have been hard at work on the sauna and the first stage is done! The sauna walls, gable and ridgepole are sitting in the yard at the cabin between the cabin and the yurt. It's up to me now to get the site prepared. We had some discussions on moving the sauna just 40 feet to a level bench beside the chicken coop but we've decided to put it up on the hill above the stream as we originally planned. I've cleared the brush and staked out the corners. Now to clear the soil to bedrock, pour the foundations and build the floor before the sauna can be moved. As the cabin is booked solid for the summer, I'll have to hustle. Anyways we won't be using the sauna until the fall so we have some time to work on this.
We'll be taking the sauna apart, log by log, carrying them up the hill and reassembling. Sounds like a lot of work but lots of fun!!! Anyone up for a sauna building party?
I've been clearing an area behind our temporary storage tent (two years and counting) for a permanent woodshed and storage area. I figure I have a 6-8 feet by 30 foot area to work in so this is perfect for a long shed divided into areas for firewood, tools, chainsaws, everything!!!
I'm working on a design now but I can tell you it will be framed out of balsam taken down right on sight. We're a big fan of the 100 mile local
idea but I'm an even bigger fan of the 100 feet local concept! I'm thinking of slabbing balsam for the walls, an idea to discuss with Josh. The floors will be skids for the wood and plain dirt in the storage and work areas. Oh yeah, power. Hmmm, maybe a long extension cord from the cabin???
Well Josh was lucky, he finished off the sauna just as the blackflies came out. They were miserable on the weekend and Lucy had a smudge pot going to keep them away. I've never seen them so early nor so bad here. Luckily it snowed on Monday night so that should keep them in check for a couple of days I hope.
Lucy and I went fiddlehead picking Monday evening. We could barely see a fern on our Saturday walk and by Monday some of them were fully opened. Still lots in the ground and we have our other "secret" fiddlehead area to yet explore. Oh yes, lots of wild garlic too!
I’m getting pretty good at this now. First you find a spot, hmmm looks kinda flat back here amongst all these trees. Next you cut the trees down, that’s about a half dozen balsams I’ve got to get rid of – kindling for next winter. Then you clear the brush out. Next you measure out the area, lots of room for an 8x16 shed. Next cut down the stumps and level the ground, sure hope this is enough soil to cover these stumps. Then you cut some trees to length (recycle those balsams), remove the bark, dig some holes, back fill them with gravel and set the four corners up. Now you can see what the shed will look like, looks good.
That’s it so far and that’s three days work too! Oh yes, I did clear out a small tentshed, tear down the tent, move the tent platform to beside the yurt, set up the tent shed again and put all the stuff back in. That was a good ½ days work right there.
Lucy and I were driving down the trail near the garden of weeks and we saw fresh tracks coming out of the swamp. There is a fence up there that is missing a section that the neighbours have permission to use in the fall to get to their hunting camp. Well there were trike and motocross tracks so up we went with four cedar poles, four boards and a couple of shovels and in an hour we had a pretty substantial fence covering up that hole. A No Trespassing sign made the job complete.
We also picked up a Husquvarna rototiller on Saturday. It is 5hp with rear tines, a really good machine. Right after that it was off to Lucy’s sister, Rose, in Spencerville to dig out a couple of dozen raspberry bushes and back to plant. We tilled across the road from the Garden of Weeds. The tiller is great but it doesn’t do rocks well so we stopped after awhile and switched to turning the earth with shovels and getting all the rocks out. There were quite a few that were larger than soccer balls (and heavier too). Well we got the ground and all the wood shavings tilled in along with chicken straw, black earth and whatever else was around and it looked pretty good. Lucy dug the holes and planted the bushes while I got the water set up. We have a spring not far away and with a couple of garden hoses I was able to bring the water all the way to the garden and fill a couple of barrels at the same time too. Next to pump some water up to the 300 gallon container above the Garden of Weeds. I also got about 300 gallons pumped up to 55 gallon drums at the cabin. The main tank is refilling from the spring and once that is done I have one more tank above to fill and that will be it. It should last the summer/fall but with all the rentals I’m a bit concerned about water usage.
Whew, that was a lot!
Well the sand boys dumped 6 truckloads of sand/gravel at the trailhead
and Dwight got to play with Zach the tractor. Last year I had tried to
take gravel out of the hillside with little success. Now with piles of
sand everywhere it was easy to scoop it up, dump it down and back blade
it into a perfectly flat layer in the yard. Just kidding! I suppose in
a couple years when I get good at this it will go easy but for now,
getting it on the ground and in some semblance of flatness is just
great. I also got a couple of trailer loads of sand to the beaver dam to
fill in the washout from last spring. A couple more loads and it will
be fine.
Now John had asked me to remove an island of soil in the middle of the
parking lot and I drove in about 5PM Saturday but hey, happy hour was on
so it was back to the house for Zach. Next morning Zach seemed a bit
hard to start and halfway to Johns the diesel light came on and Zach
just died. The fuel gauge had been bouncing between 1/4 tank and empty.
Now I had borrowed Randy's tractor last week to use his chipper and I
had siphoned about 4 litres out of Zach to replace the fuel I used. Had
I inadvertently drained the tank??? I borrowed John's car (Zach was
blocking the road the big brute) and off to Perkins to pick up some
diesel. I filled Zach up (1/2 tank) and drove to Johns.
I got a couple of scoops of dirt dumped down the hill no problem but
then Zach died again. Now I remember when I was siphoning fuel I
stopped when I saw some black gunk coming down the tube. Had I fouled
the injectors with dirty fuel? (Those who know diesel can laugh now).
Well, after a 5 minute wait Zach started but then died again. Amber, a
friend of Johns, has her own tractor (cool eh) so she started diagnosing
the problem. She found the primer pump and pumped vigorously while I
tried Zach. Well Zach started but died again. What was wrong? A quick
call to her husband the the diagnosis was air in the fuel line. Well
that made sense if I had dun out of fuel so it was tap the injectors and
bled the fuel lines while the tractor was running. Well we managed to
get one open but the others were seized and the nuts threatened to break
the metal fuel lines instead of screwing off freely. Dejected we quite
and left Zach on John's front law. Made a nice sculpture.
On Monday the plan was to email Doug about my plight, drop by the guy I
bought the tractor from to get the name of his mechanic, drop by Dave
Murphy, the local fix it man and lastly to stop in on the sand boys who
have lots of diesel toys.
Well Dave said, "You ran out of diesel? That's baaad!" Could he help?
"I'll be over after dinner." So I had my help fixing Zach.
There is a clear glass bulb that collects water and crap in the fuel and
you can drain. Dave noticed a lot of air bubbles in the glass container
when the fuel pump was running. "You got an air leak in your fuel line"
he said, "Most probably a rotten fuel line." Well the line from the tank
to the fuel pump looked pretty ratty and cracked, yep that was probably
it. "Tell you what" , he said, "Pick up a couple of diesel lines, one
from the tank to the pump, the other to the engine, about 6 feet of each
and we'll finish the job tomorrow." I got Dave to cut off a few inches
of each as they were different sizes but what sizes, right?
Well I had tuesday off but Lucy was heading into town to pick up the
kids for a day visit so I got her to pick up the hose. I worked around
the house most of the morning but then headed up to Dave's as he had a
sawmill in and I wanted to see it in action. I spent a couple of hours
learning and helping before heading back to Owls Nest. Dave showed up a
few hours later and we started. First we had to replace the fuel line
to the tank which meant dropping the tank which meant draining it. Well
we drained more than 5 gallons about twice what I had put in (so much
for running out of fuel). We dropped the tank, replaced the hose and
put the tank back. Well no fuel coming out of the fuel pump so the pump
must be bad right? Well I wanted to be sure so we hooked up a spare
tube to a container full of diesel and sure enough the pump worked.
Hmmm,what could it be? "Pinched hose" Dave said so back down came the
fuel tank, back went the fuel line and sure enough the pump worked.
Dave had me pull in about 6 inches of hose as he lined it up and back up
went the tank. We tried again and yes the pump worked, spewing fuel
into the spare diesel container. I went to hook up the pump outline
back to the tractor and the metal inline rotated as I tried to force the
hose on. "That's not good" we both said in unison and as soon as we had
the tube back on we tightened a couple of bleeder screws that seemed a
bit loose. Try the fuel pump again and no bubbles in the glass tube.
Had we found the air leak, just a loose bolt? Well I started Zach up and
he purred, happy once again So we packed up our tools, siphoned the fuel
back into the tank and I drove Zach home.
Lucy and I have been living at the cabin for three weeks now with another two to go before we move again. It’s very nice here on these hot summer days. Too hot to work much in fact which is all right with me.
Well last year I set up our gynormous cooler with the cold spring water flowing in the drain plug and flowing out through the top, keeping the drinks nice and cool. This year was the same and really welcomed with all the heat, but as usual, our spring has dried up and what to do? Now we have tons of power in the summer, and I had been reading about converting a freezer into a fridge so we went out and bought a small freezer and I have ordered a portable cooling thermostat that you plug the freezer into and control the temp.
What a brilliant idea The freezer hardly makes a dent in our power. I’m still playing with the settings but it seems that on minimum, the freezer hovers around the –2C range. Cold enough to freeze ice (ice cubes anyone) and cold enough to make super cooled drinks but just warm enough not to freeze pop, beer or bubbly! Maybe I don’t even need the control thermostat???
ON a really hot day what’s better than splashing about in the lake??? To keep things fun, Lucy has gone out and bought a whole pile of water toys including a couple of floating chairs, rafts, loungers and new lagoons! The blue lagoon has sprung leaks and although we keep valiantly trying to patch it, once a few more bodies pile on it starts to deflate again. If anyone is going to Lake George, New York where the Colman Outlet store is, let us know and we’ll get you to pick us up a couple of new ones. I got a boarding ladder up on the cedar float so it’s easy do a cannonball and clamber back up.
There had been an old cabin on the property many years ago and the occupants had no concerns with using the lake as a dump. Lucy and I have been cleaning up the shoreline pulling out old bed springs, rusty unidentifiable stuff and lots of broken glass (and bullet casings too). Things are much tidier and safer now and along the way we discovered a shelf of white stone slowly falling off into the lake. Now we have our own tiny beach that we can sit on in the plastic chairs and swim from into the lake!
Yep I’m still working on the shed. Instead of levelling the ground I decided to take out the tree stump that was the cause of building up the ground. Well this one stump seems to be about 6 trees all grown together. After cutting it down about a foot I decided to dig around it and go after the roots. I’m about a third of the way done and my chainsaw sharpening skills are getting lots of use.
Up on the hill I discovered a large flat rock that I am slowly uncovering. If it keeps going back into the hill I could be able to build the sauna foundation on flat ground. Of course the hill keeps going up and I am now having to dig down 3 feet and more as I move back into the hill. Oh well, I’m about ½ way and have lots of fill for below.
Well Lucy and I spent most of our summer on the move, between Owls Nest, Margy’s cottage and now back at the cabin.
It’s the end of summer and it seems like the animals as on the move as well. Earlier this week I saw two mink by the creek as I walked to my car about 6:30 AM. They were all black and about the size of a cat although their gait reminds you of a spring, definitely not like a cat. They weren’t that quiet as they moved along the creekside, squeaking and moving through the brush. Within moments they were come and gone.
The next morning I saw a family of racoons, two adults and five kits. The kits were moving through the stream bed looking for stuff to eat no doubt as they moved downstream. Mom and dad were in the brush at the side. Once they heard me Mom (or Dad) made a bunch of squeaking noises and the kits ran up the closest tree. They were real cute peering down trying to see what the cause of the commotion was. I wish I had my camera.
Coming home that night I flushed two deer from the creek at the very same spot. Perhaps I should build a cabana there so we could watch the animals in comfort?
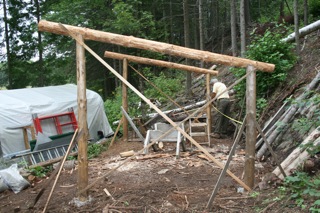
Stuff, stuff, stuff, where to put it all?? I know, build a shed. Having dragged down all the logs for the sauna, I feel that building a pole shed should be a snap. The first part is finding a site and the tree and scrub covered area beside the chicken coop looks perfect. Two months later (we rented the cabin for most of that time), I’ve managed to cut down the trees, dig out the rocks and stumps and level the ground. Cutting out stumps with a chainsaw is hard work and I totally ruined one chain, but it was worth it.
The shed is going to be 16’ x 8’ so that is quite a big area to clear and level. Next I cut six posts, about 8” across, into three 8 footers and three 6 footers. This will give me a 4:1 slope on the roof. I put gravel footings in and stand the posts on the gravel. Lots of strapping keeps them standing straight. You have to measure and remeasure the distance between the posts (8’) and use the level to ensure they are straight.
The 8’x 16’ shed has two sides and a center. Each one of these three elements is called a bent. For a pole shed you build the bents first. The next step was to cut 11’ beams, 2’ overhang on the front and 1’ on the back. Next I cut the post tops at an angle and cut notches in the beams. Getting these heavy logs up was difficult but Lucy helped with the lifting. Next I drilled into the beams and spiked them together.
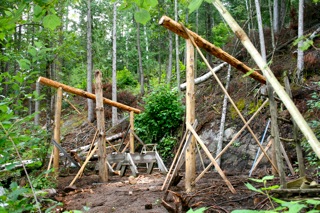
Next was getting the rafters up. With 2’ overhangs I needed 20’ logs! There were a number of tree tops and smaller trees down so I used 4’ logs for the rafters. Oh yes, I had to peal all the logs first so my time with Josh Dagg peeling logs for the sauna paid off.
The rafter poles were easier to get up as they were lighter and I could slide them over the bents. Blocks of wood nailed in place kept them from rolling off the back. I used the level to level them, swinging two of them around. With logs you need to consider that logs taper down and you need to place them in alternate directions to even out the change in size. As well, cutting notches changes the height as well. I have three rafter poles up and plan on adding a couple more. These won’t be 20’ (I’ve run out) but I have lots of 10 footers that I will overlap in the middle.
Now that the frame is up I’ll be cutting brace pieces to stiffen the structure. Then I’ll nail some boards on the sides and voila!
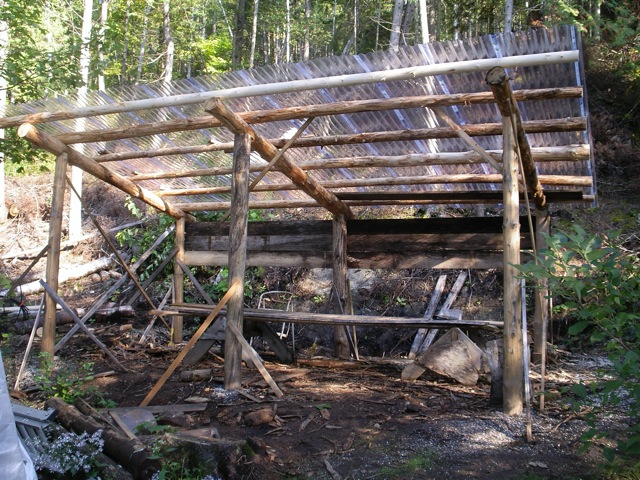
Well the shed is coming along nicely. I got 6 crossbeams on the roof. Calculations called for 11 - 12foot clear plastic panels which got levered up and placed. Getting them squared was tricky and it took three resets to lay them out. Even so I am off 2 inches from one end to another. Good thing they are clear and you can’t see it. Too bad I didn’t peel off the white tape on every sheet edge.
Lucy and John had a bunch of planks sawn many years ago and the remnants have been slowly rotting in piles back in the bush. I happened to stumble on them and digging down through the rot, I discovered that there were many good boards or ends of boards that I could use. Interestingly many of the ones I found in good shape are popular. Although I could have used the 16 footers to completely cover the back of the shed I matched boards and with the good ends started in the middle and laid them outwards, using the chainsaw to cut the rotten ends off. As this is a rustic shed, it doesn’t look too bad.

Logging roads get bulldozed to where the trees are, not to where you might want them to go. Surprisingly though, they sometimes almost go to where you want them to. There is one bush road that goes from the cabin trailhead to within 500 feet of the ring road around Owls Nest. I asked the boys about making an AVT trail to connect the two. They said to lay out the trail and cut a 30 foot swath for the excavator to get through. Once done they would come in and in a couple of days and a few $K I would have my connector road.
Now I wasn’t too happy about having to cut all those trees especially as the trail I needed only had to be about 8 feet wide. The trail I needed had to contour a hill and by careful marking I was able to find a route that only needed about 6 relatively smallish trees cut, all less than a foot in diameter. The cut trees and other brush got laid down on the down slope and with the new pick axe that my sweetie bought me, I started taking down the hillside to level off the trail. It was a lot of work over many days but eventually I could drive the ATV through. The next trick was to haul gravel for fill. The end of the bush road came along the side of a hill as well and when I drove there I noticed that the hillside was all gravel so I hitched up the trailer, drove to the gravel and started filling up. It takes 150 shovels to ¾ fill the trailer so that’s what I did, about a dozen times, each time driving back further and further until the trail bed was pretty well done. I’ll have to do another round of gravel as it all settles which brings me to ….
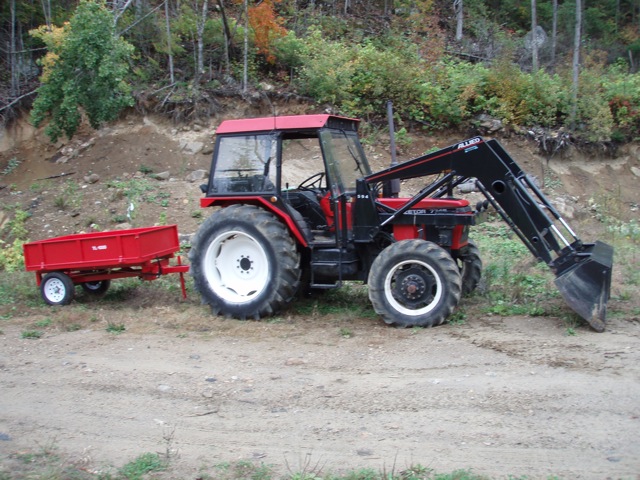
Getting good equipment is always important but getting the right equipment is more so. After careful consideration over a long time I decided that a dumping trailer was the next piece of equipment to buy. (and perhaps I should have bought it sooner) I wanted something that I could haul behind the tractor but not too big as I would be going up hills and over rough terrain. The most common dumping trailer is one you haul behind a truck. It has it’s own hydraulic lift and battery power system. They range from 1-10 tons and single or double axle. They also range from $3K to $12K and up. I choose a 1 ton dumping trailer made in China from the largest farm equipment manufacturer in the world (that no one has ever heard of). This trailer is awesome. It has a hydraulic system that plugs into the tractor hydraulics so dumping is easy. It can stand alone so I can load it with the tractor, back up, hitch up and away I go. The dealer told me they had loaded it to 3 tons and there was no problem. I’m gonna use it to haul dirt for my road building projects.
The Mongols are coming, the Mongols are coming!!!!! Well maybe not but the yurt is moving. We’ve been saying that for the past two years now but we’ve got a plan and it’s in play.
Just down the driveway at Owls Nest, past the chicken coop, there is a trail that cuts across a gentle slope and into the woods. At one time this area had been cleared and I spent last spring reclearing it in anticipation of making it into our orchard area. It is south facing and would get plenty of light but the problem was the considerable number of trees between the field and the lake which would have to be cut down. Later I thought this would be a great place to build a three bay garage/workshop.
Now we have decided that this would be a great spot for the yurt this winter. When we lived at Lone Wolf, Lucy ran a B&B out of the yurt during the winter months but last winter we stayed at Owls Nest and the yurt went unused. This year we’ll try the yurt rental again.
A neighbour, Jean Francois, came with his backhoe and levelled the area. Lucy’s son Josh has been around for a few days and yesterday he helped me bring in several loads of sand to top dress the yurt location. He drove the van with a trailer behind which I had filled with the tractor. I also filled my tractor dumping trailer and back and forth we went hauling and dumping sand. We made two trips and together with the sand I had hauled before and an extra trip later there was just enough to cover a 20 foot circle to about 4 inches. We had a few interesting experiences. While the trailer had no problem holding three scoops of sand the van rear end sunk all the way down so that there was a fear that the tires would scrap on the wheel wells. Also the trailer isn’t a dumping trailer and we were not looking forward to shovelling out the trailer by hand. We solved this by putting a chain under the tongue of the trailer, lifting it off the van hitch, moving the van and then lifting the trailer up. By moving the tractor forwards and back while lifting the trailer I was able to get it completely vertical and there was no shovelling to be done at all. One time the hitch didn’t disconnect immediately and the tractor lifted the back wheels of the van up along with the trailer! Zack sure is one powerful tractor!!!
John picked up a couple of tarps from Princess Auto and the next task is to pick up about 60 bails of hay that the yurt platform will sit on. I’m getting these free from a friend at work who has old bales of hay sitting in his barn. Lucy is busy pricing and ordering lumber for a cheaper yurt platform. Once that is built we will move the yurt furniture first and then the yurt itself, reassembling it and putting the furniture back in. We’re hoping that a long extension cord from the house will provide power and there we have it.
Move the yurt, sounds simple but it has been weeks of work and planning to date. Now what to do with the old yurt platform? I know, move it to a summer location and then we can use the yurt winter and summer
I’ve been looking for a 4x4 truck for a while now. Something cheap, a yard truck, not necessarily pretty, rusted would be okay, no need to plate it, it just has to work. I’ve been searching used gatineau and kijiji figuring what was a good deal. I’d made several tries even replying within hours of seeing a great deal posted but was always too late. Then paydirt, a 1983 Ford F250 in Deep River. It just had a few minor problems such as a gas guage that didn’t work and a starter that was ready to quit, but no rust, ran well and was to be had for only $900! Best of all, I was in the game.
Getting it looked at and then home was a concern, but as Dave says, for $900 and it runs? Who cares about inspecting it! Well I had Dave call the guy to ask questions and the truck sounds okay. I lined John up to drive me up there on Thursday so I could go to the license bureau and change ownership there, insurance was lined up, etc. Just get there, take it out for a test spin and then drive it home. Oh yes, it was blue.
Wednesday night I get a call from the owner. It seems the starter won’t engage no matter how much banging and cursing. Well I can’t go all the way there for a truck that won’t start. Your bad luck, but you’ll have to find a starter.
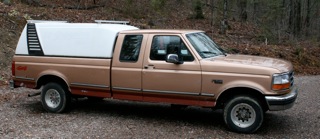
Meanwhile Dave is back to me telling me to forget the truck because he found me a 1993 Ford F150 for only $300!!!Quebec plated too. Great, two trucks, one for Lucy and one for me. Well I never heard back from the Deep River guy but I am now driving a Ford F150 4x4 extended cab truck, that is plated and licensed to drive on the road for only $300!!! Santa came early this year.
Two trips with the trailer to see my friend Brent in Winchester and his pile of “free” hay, resulted in 68 hay bales in a 20’ x 20’ square on the ground. The downside of “free” hay is that they are misshapen and not even on the ground. No problemo, just cut open the excess hay bales, stuff the gaps and there you are, sorta, maybe, hope it works ….
Next we laid 14? Sheets of plywood on 2x4’s every 4 feet, and with a nail, string, tape measure and magic marker, drew out an 18’ circle, the diameter of the yurt. Using a jigsaw to cut the plywood and the chainsaw to cut the 2x4’s we cut out the yurt floor. Then we took it all apart again, stuffed more hay in the low spots and screwed it all together. Then we covered it with a tarp just moments before the snow started coming down.
About a week later, the lake at the cabin was frozen hard enough to travel across with a sled. Lucy and I took a day to empty the yurt and take the furniture to Owls Nest. Another day of dismantling and sledding got the yurt across the lake, onto the ATV trailer and to the trailhead where it was loaded onto the big trailer and into the back of the truck. The heaviest item was the wood stove which we just managed to walk out of they yurt onto the sled without dropping it onto our toes. This moving is tough.
Lucy was busy setting up the yurt last Friday when I got home from work. She had the walls up, the roof poles ready and the tono set to lift. I helped her get it up and we laid the roof poles before it got dark. We were both pretty tired by then and the poles weren’t sitting properly. That night we reviewed the instructions (funny that) and noticed we had started setting it up wrong so Saturday morning the roof came down and went up properly and easily second time around. I was worried about getting the coverings on but the rest went quite easily. First the netting, next the roof felts, then the wall felts, next the tyvec and finally the canvas cover. We were finished by dusk, just in time for the big dump of snow and rain on Sunday. We spent part of Sunday putting furniture back inside the yurt and then dried everything out with the kerosene heater. It was nice and warm and we were very snug and dry inside. The yurt looks great. Lucy has rearranged the furniture and it looks bigger and more comfy that before if that was possible.